Vue2全家桶实现: (1)mini vue-router
这里尝试自己实现一个简单版本的 vue-router,再结合 vue-router 源码,就可以彻底理解 vue-router 底层逻辑、实现原理。这样以后面试就不怕被问 vue-router 源码相关的面试题了,比如:vue-router 只能在 Vue 中使用,为什么?为什么需要有 router-view,router-view 组件的本质是什么?router-link 和 a 标签的区别在哪?vue-router 是怎么做到在单页面中做到无刷新跳转页面的?hash 模式和 history 模式以及ssr 渲染的 abstract 是怎么运行的?为什么 new Vue 时需要传入 router 实例等
实现前准备工作
首先我们使用 @vue/cli 生成一个基本的脚手架
# 这里假设你已经安装了 @vue/cli,如果没安装请先安装
vue create vue2-implement
选择 vue2 + vue-router/hash模式 + js + vuex + eslint/prettier + sass + pnpm
在 github/gitlab/gitee... 上创建一个同名仓库,将该项目同步到远程仓库,防止电脑更换,代码丢失
vue-router基础使用与运行原理
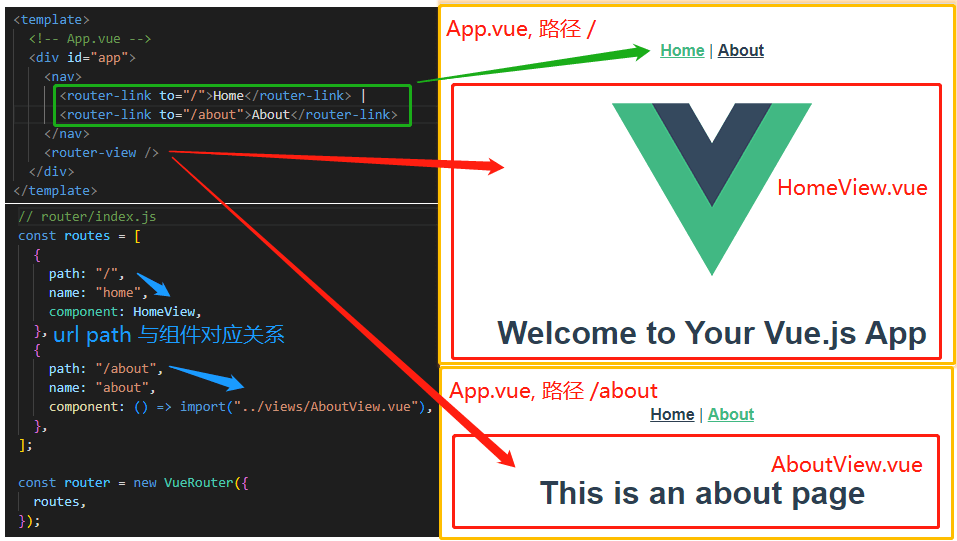
下来看下面这张图
# 页面 URL(hash模式)
http://localhost:8080/#/  # 首页
http://localhost:8080/#/about # 关于
App.vue 结构页中 router-view 组件用于占位
当监听到页面 url 变化时,根据 url - 组件对应关系更新 router-view 占位处显示的组件
更多细节
- 单页面 url 切换,通过监听hashchange 或 history 相关 api触发,分别对应 hash / history 模式
- url 与 组件对应关系,在 new VueRouter() 时,通过 routes 参数传递
- router-view 通过 render 实现,可以根据当前 url (用一个变量存储)实时切换不同组件。当监听到页面url切换时,会修改该变量。
- rotuer-link 以及程序化($router.push等)跳转,会根据路由模式(hash/history) 来决定以什么方式修改页面 url
全局组件 router-view、router-link、$router 等是怎么注入到全局的?
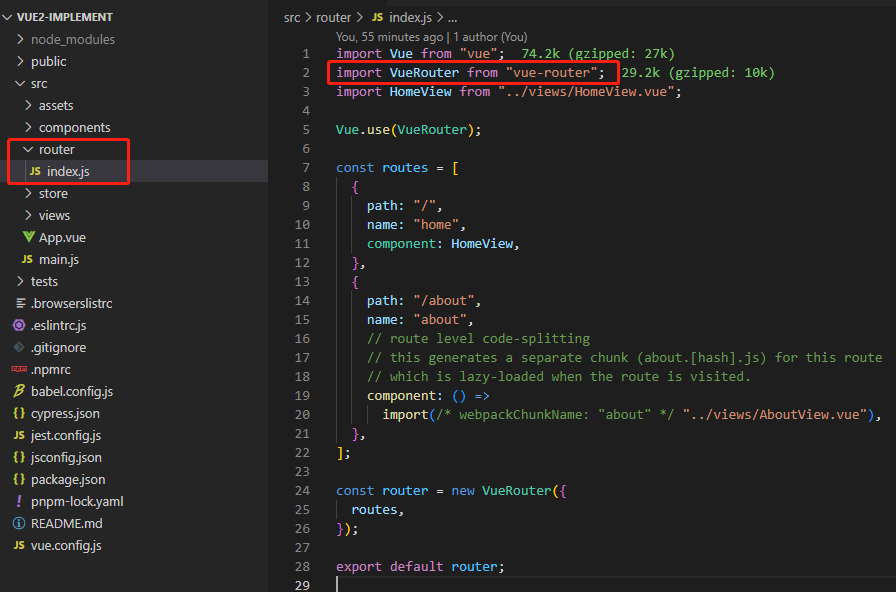
如下图,通过 Vue 插件规范,使用 Vue.use(VueRouter) ,实现 install 方法,注入逻辑
开始实现
vue-router 引入逻辑在 src/router/index.js 中,通过 "vue-router" npm 包引入 VueRouter。如果要手写 vue-router,可以从这里入手。
import VueRouter from "vue-router";
实现第一步:从我们自己写的 MyVueRouter.js 中引入 VueRouter
import VueRouter form './MyVueRouter.js'
MyVueRouter.js
class MyVueRouter {
  constructor() {}
}

export default MyVueRouter;
下面实现基础方法、组件
new VueRouter 路由配置保存
const router = new VueRouter({ routes });需要实现 constructor 构造方法 ,处理传参
constructor(options) {
    this.options = options;
    this.routeMap = {};

    // 利用 Vue 双向绑定、监听到 url 切换后,改变这个值,router-view 组件直接切换
    this.app = new _Vue({
        data: {
            curRoute: "",
        },
    });
}
url地址与组件对应关系数据处理
实现 createRouteMap 方法, routes 数据结构如下
const routes = [
    {
        path: "/",
        name: "home",
        component: HomeView,
    },
    {
        path: "/about",
        name: "about",
        component: () => import("../views/AboutView.vue"),
    },
];
创建 routeMap,这里没有考虑路由嵌套,路由嵌套会复杂一点
createRouteMap() {
    this.options.routes.forEach((route) => {
        this.routeMap[route.path] = route.component;
    });
}
url地址切换监听,更换页面组件
路由切换替换 router-view 逻辑
- hash 模式,监听 hashchange 事件,window.addEventListener('hashchange', cb)
- history 模式,监听 history.back()、history.forward()、history.go() 等,参考:url 变化监听 - 语雀
这里为方便实现,使用 hash 模式
listenUrlChange() {
    // 首次进入
    window.addEventListener("load", () => {
        this.app.curRoute = window.location.hash.slice(1) || "/";
    });
    // hash 改变
    window.addEventListener("hashchange", (e) => {
        console.log(e);
        // 除了 location 外,还可以用 HashChangeEvent 中的参数
        // { newURL: "http://localhost:8080/#/about" }
        let hashPath = new URL(e.newURL).hash;
        hashPath = hashPath[0] === "#" ? hashPath.substring(1) : "/";
        this.app.curRoute = hashPath;
    });
}
Vue.use(VueRouter) 插件 install 方法实现
Vue.use(VueRouter) 需要实现 Vue 插件方法 VueRouter.install
全局组件
- router-view 路由组件占位。url 改变时,根据 routes 配置,将 router-view 替换为具体的组件
- router-link a 标签封装
let _Vue = null;

class MyVueRouter {
  // Vue.use(VueRouter) 执行
  static install(Vue) {
    _Vue = Vue; // 保存 Vue,其他地方需要, vue-router 包里面不用包含 Vue

    Vue.mixin({
      beforeCreate() {
        // new Vue({ router }) 时,router 参数,仅在根组件执行一次
        if (this.$options.router) {
          Vue.prototype.$router = this.$options.router; // $route 同理
          this.$options.router.init();
        }
      },
    });
  }
}
在 init 方法中执行前面的 createRouteMap 和 listenUrlChange,再加上全局组件的创建
init() {
    this.createRouteMap(); // 根据 routes 拿到 url => 组件 对应关系
    // install 在 new Vue() 之前,双向绑定 curRoute 数据在 new Vue 创建,挪到 init 中处理
    this.initComponent();
    this.listenUrlChange();
}
全局组件 router-view 与 router-link
initComponent 实现
initComponent() {
    // <router-view></router-view>
    _Vue.component("RouterView", {
        render: (h) => {
            let component = this.routeMap[this.app.curRoute];
            return h(component);
        },
    });

    // <router-link to="/about">foo</router-link>
    _Vue.component("RouterLink", {
        props: { to: String },
        render(h) {
            // h(tag, options, children) 子元素使用默认插槽,这里使用简单 hash 模式 #/about
            let options = { attrs: { href: `#${this.to}` } };
            return h("a", options, [this.$slots.default]);
        },
    });
}
完整代码
下面时 MyVueRouter.js 完整代码,可以运行的完整代码,参见 https://github.com/dev-zuo/vue2-implement vue-router 分支
// src/router/MyVueRouter.js
let _Vue = null;

class MyVueRouter {
  // Vue.use(VueRouter) 执行
  static install(Vue) {
    _Vue = Vue; // 保存 Vue,其他地方需要, vue-router 包里面不用包含 Vue

    Vue.mixin({
      beforeCreate() {
        // new Vue() 时,router 参数,仅在根组件执行一次
        if (this.$options.router) {
          Vue.prototype.$router = this.$options.router; // $route 同理
          this.$options.router.init();
        }
      },
    });
  }

  constructor(options) {
    this.options = options;
    this.routeMap = {};

    // 利用 Vue 双向绑定、监听到 url 切换后,改变这个值,router-view 组件直接切换
    this.app = new _Vue({
      data: {
        curRoute: "",
      },
    });
  }

  init() {
    this.createRouteMap(); // 根据 routes 拿到 url => 组件 对应关系
    this.initComponent(); // install 在 new Vue() 之前,双向绑定 curRoute 数据在 new Vue 创建,挪到 init 中处理
    this.listenUrlChange();
  }

  createRouteMap() {
    this.options.routes.forEach((route) => {
      this.routeMap[route.path] = route.component;
    });
  }

  initComponent() {
    // <router-view></router-view>
    _Vue.component("RouterView", {
      render: (h) => {
        let component = this.routeMap[this.app.curRoute];
        return h(component);
      },
    });

    // <router-link to="/about">foo</router-link>
    _Vue.component("RouterLink", {
      props: { to: String },
      render(h) {
        // h(tag, options, children) 子元素使用默认插槽,这里使用简单 hash 模式 #/about
        let options = { attrs: { href: `#${this.to}` } };
        return h("a", options, [this.$slots.default]);
      },
    });
  }

  listenUrlChange() {
    // 首次进入
    window.addEventListener("load", () => {
      this.app.curRoute = window.location.hash.slice(1) || "/";
    });
    // hash 改变
    window.addEventListener("hashchange", (e) => {
      console.log(e);
      // 除了 location 外,还可以用 HashChangeEvent 中的参数 { newURL: "http://localhost:8080/#/about" }
      let hashPath = new URL(e.newURL).hash;
      hashPath = hashPath[0] === "#" ? hashPath.substring(1) : "/"; // http://localhost:8080/#/
      this.app.curRoute = hashPath;
    });
  }
}

export default MyVueRouter;
功能验证
修改 router/index.js
// import VueRouter from "vue-router";
import VueRouter from "./MyVueRouter";
App.vue 中增加 <p>{{ $router.app.curRoute }}</p> 查看效果
<template>
  <div id="app">
    <!-- <nav>...</nav> -->
    <p>{{ $router.app.curRoute }}</p>
    <router-view />
  </div>
</template>
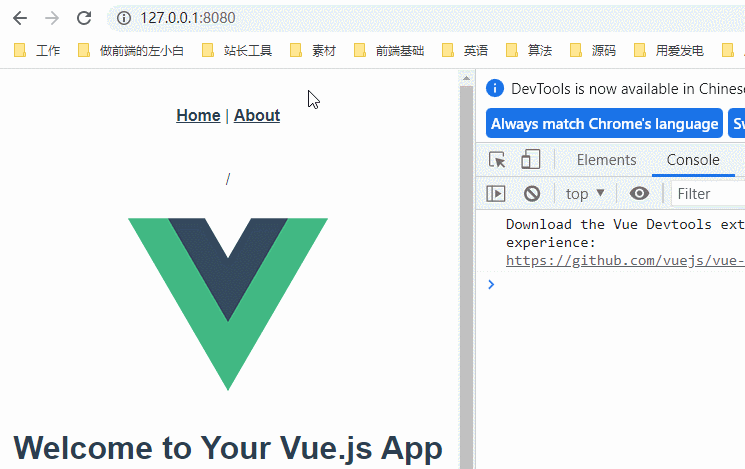
运行效果良好
更深层级探索
上面只是简单的实现了 hash 模式下的基本功能,还有一些功能可以继续深入探索
路由嵌套
history 模式、服务端渲染 'abstract' 模式
程序化跳转
路由钩子(守卫)
动态路由 addRoutes、getRoutes
vue-router 插件
单元测试、e2e test
vue-router 源码
源码地址:https://github.com/vuejs/vue-router/blob/dev/src/index.js
弄懂上面的基础逻辑后,再慢慢看源码就简单了。
源码里面 index 入口,install、createRouteMap 等基本都是分模块,在多个文件中实现。
错误判断更严谨,包含单测、e2e 测试
打包、发布等
扩展思考
1、Vue.use(VueRouter) 时,可以传入 router 实例,为什么在 new Vue() 时也需要传入?
理论上 router/index.js 中可以拿到 router 实例,可以直接 Vue.use(MyPlugin, { someOption: true, router }) 将 router 实例传给 install 方法。
但为什么需要导出 router 实例,然后在 main.js 中 new Vue() 时当做参数传入?这里作为一个思考题,下面我们来看具体实现
// main.js
import Vue from "vue";
import App from "./App.vue";
import router from "./router";
import store from "./store";

Vue.config.productionTip = false;

new Vue({
  router,
  store,
  render: (h) => h(App),
}).$mount("#app");
解答:
上面是 vue2 版本的 vue-router 对应 3.x 版本,在 vue3 对应的版本 4.x 中改进了这一点,下面是官网给出的示例
参考:https://router.vuejs.org/zh/guide/#javascript
// vue-router 4.x 版本
// 3. 创建路由实例并传递 `routes` 配置
// 你可以在这里输入更多的配置,但我们在这里
// 暂时保持简单
const router = VueRouter.createRouter({
  // 4. 内部提供了 history 模式的实现。为了简单起见,我们在这里使用 hash 模式。
  history: VueRouter.createWebHashHistory(),
  routes, // `routes: routes` 的缩写
})

// 5. 创建并挂载根实例
const app = Vue.createApp({})
//确保 _use_ 路由实例使
//整个应用支持路由。
app.use(router)

app.mount('#app')

// 现在,应用已经启动了!
2、cdn 引入不需要 Vue.use,如果使用模块化机制编程,要调用 Vue.use(VueRouter),为什么?
在 vue-router 官网 中有下面一个例子
// 0. 如果使用模块化机制编程,导入Vue和VueRouter,要调用 Vue.use(VueRouter)
// 1. 2. 省略
// 3. 创建 router 实例,然后传 `routes` 配置
// 你还可以传别的配置参数, 不过先这么简单着吧。
const router = new VueRouter({
  routes // (缩写) 相当于 routes: routes
})

// 4. 创建和挂载根实例。
// 记得要通过 router 配置参数注入路由,
// 从而让整个应用都有路由功能
const app = new Vue({
  router
}).$mount('#app')

// 现在,应用已经启动了!
解答:
其实 cdn 方式引用时,也调用了 Vue.use 只是 vue-router 内部直接处理的,参考源码
// https://github.com/vuejs/vue-router/blob/dev/src/index.js  292 lines

if (inBrowser && window.Vue) {
  window.Vue.use(VueRouter)
}